Da Vinci Resolve editing videos with weaker hardware
Ich habe ja schon des öfteren seit meinem Umstieg auf DaVinci Resolve über diese Programm berichtet. Heute soll es darum gehen, wie man mit DaVinci Resolve trotz schwächerer Hardware trotzdem noch recht gut Videos editieren kann.
Introduction

Da Vinci Resolve has become my video editing program because it offers everything in one place, and I have now even switched to the Studio version, which offers even more features for a moderate one-off price of €300. Video editing, especially of 4K material in H265, requires a pretty powerful computer, which is why I treated myself to a new computer at the beginning of this year after almost 7 years.
But I have always used Da Vinci Resolve, especially for my YouTube videos, on a weaker computer, such as the Asrock Deskmini X300, which does not have a dedicated graphics card. But newer cameras have larger formats and this is where it becomes difficult with a rather low-performance computer.
Nevertheless, it can be done with such a computer or a laptop, although perhaps with limitations in one place or another.
I recorded a video for this:
Possible solutions in the settings
There are two ways to reduce the load on the computer on which you are editing the video. Firstly, you can reduce the resolution of the timeline to a quarter, for example, because the preview window will hardly take up more than 1/4 of the total screen. This can save a lot of computing effort and ensure smoother work.
Then you can reduce the resolution of the timeline for the actual editing process, e.g. from 4K to 1080p. You just have to remember to reset it before the final rendering of the video. That’s why I only tried it once.
Last but not least, you can put all adjustments, i.e. color grading, effects, etc., into an adjustment clip and deactivate it during editing. Then you just cut the raw material, so to speak, without the computer not only having to prepare the codec, but also gradients and other effects.
The better solution is working with proxies?
There have always been proxy files that you could use to relieve the system. But they were stored centrally and then filled up the relevant drives. Now there are a few settings that make life with proxies easier.
First, in the preferences under the “Optimized media and reader cache” section, you make sure that only a quarter of the resolution is used here.
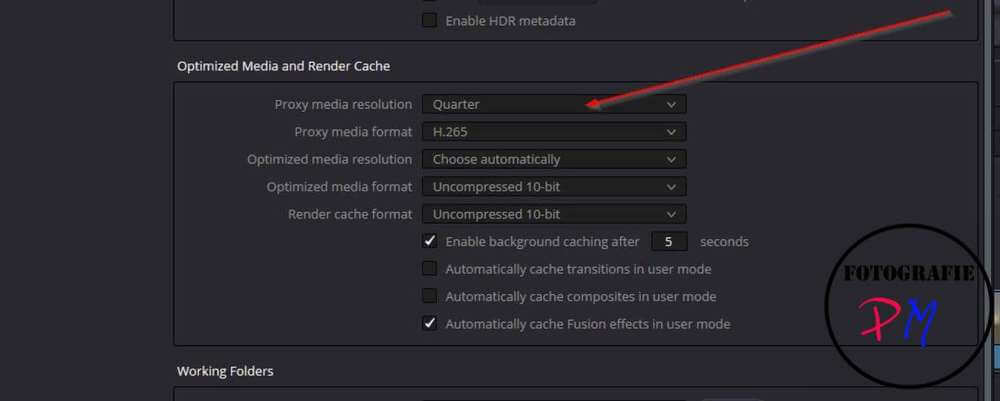
If the computer requires it, you can go down to 1/8 or more in an emergency. You also have to try out whether you leave it at the H265 setting, depending on your computer, or perhaps select H264 as a less heavily compressed format.
The working folders can be adopted without any changes.

The “Proxy Generation location” mentioned here is the folder that regularly overflows when using proxies. But now comes the crucial setting:
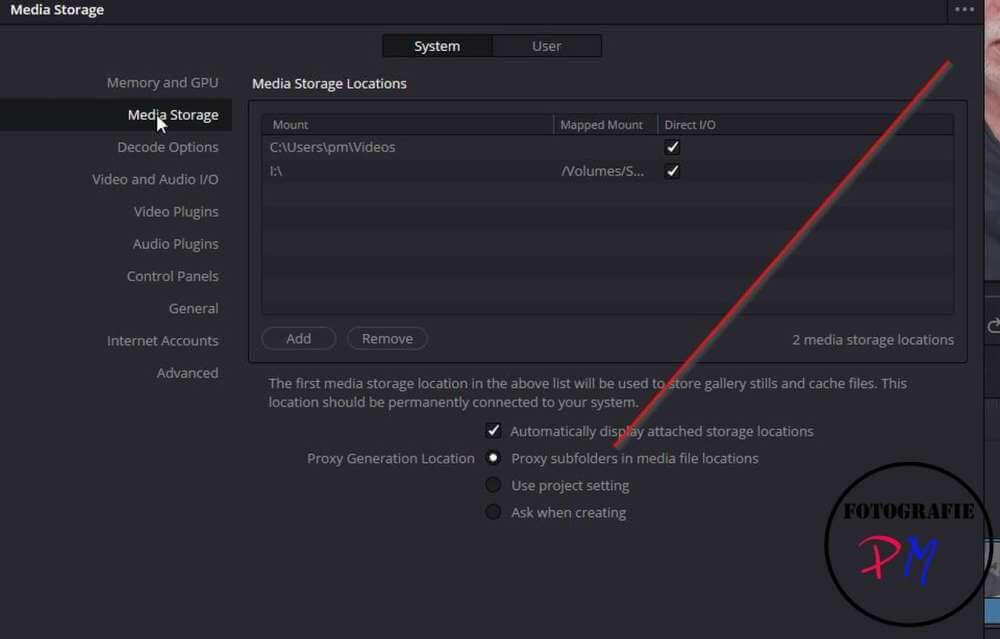
Here the setting “Proxy in Subfolder…” ensures that the proxy files are created in a subdirectory where your video clips are located.
You can then mark the relevant video clips and right-click to start generating the proxy files.
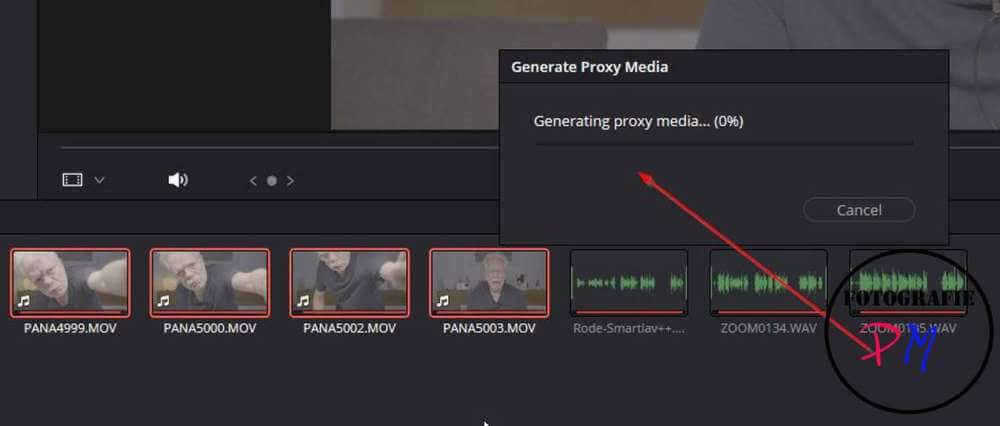
This process depends on the length of the clips, how powerful your computer is, etc. This can take minutes or hours. After that, all clips are marked with a symbol that indicates that proxy files exist here.
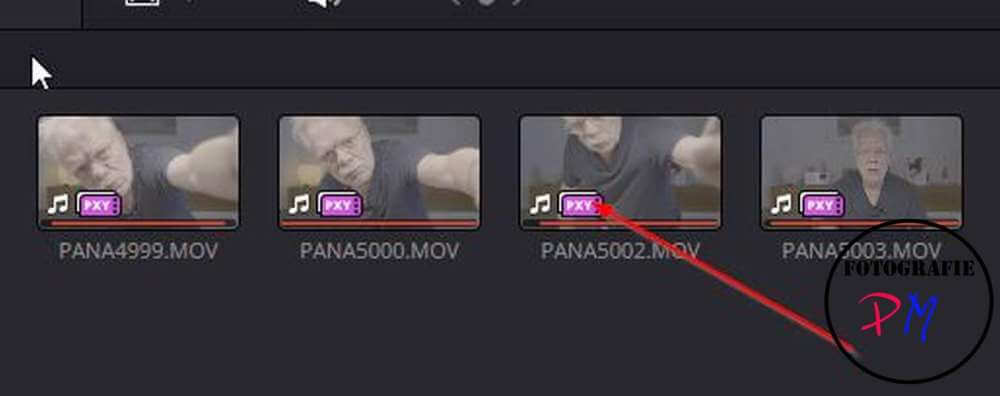
This type of proxy file generation has a disadvantage, however, because Da Vinci Resolve cannot be used during this time, so you cannot start editing, for example. For this there is the
Blackmagic Proxy Generator
This is a standalone program that creates proxy files independently of the editing program.
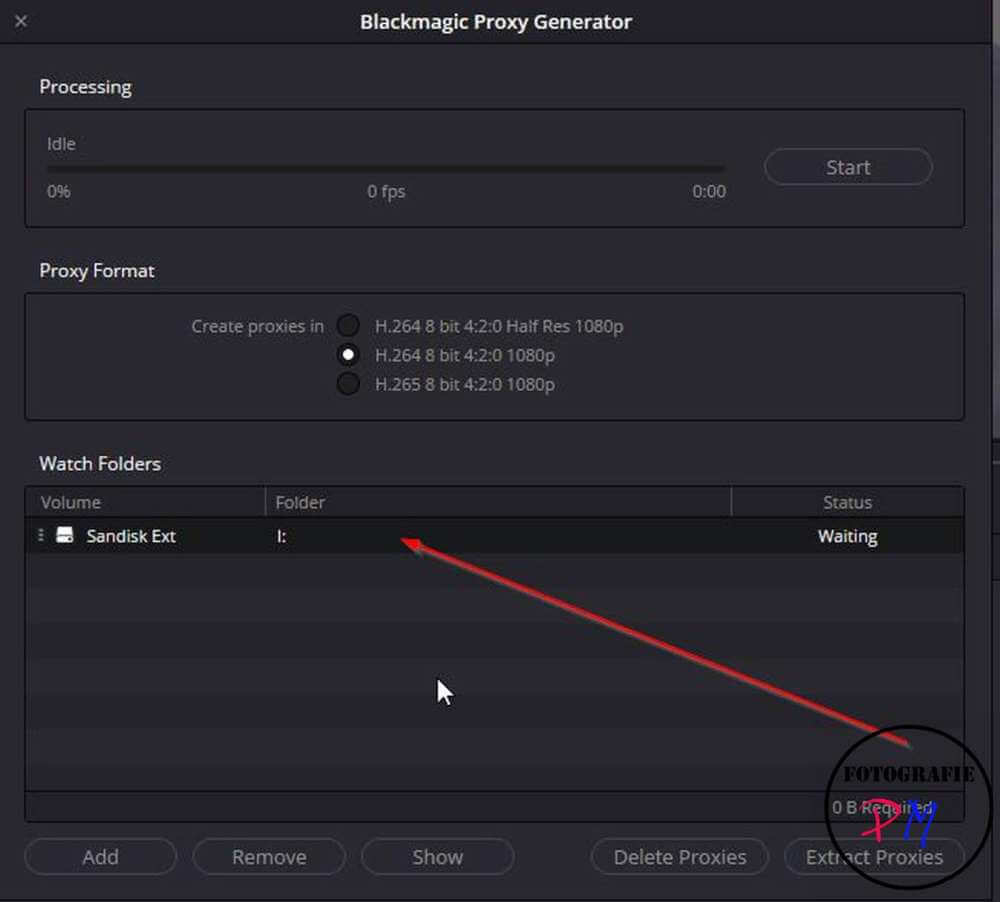
I just want to mention it, I haven’t used it yet. This is probably because I usually only have a few clips and I create them myself in Da Vinci Resolve.
Panasonic S5 IIx
The Lumix S5 II x can film in Opengate, i.e. 6K, among other things. And a PC like the small X300 sometimes has problems with that, so I use proxy files here too. However, this camera recently had a firmware update that, in addition to a few other improvements, also allows proxy files to be saved at the same time.
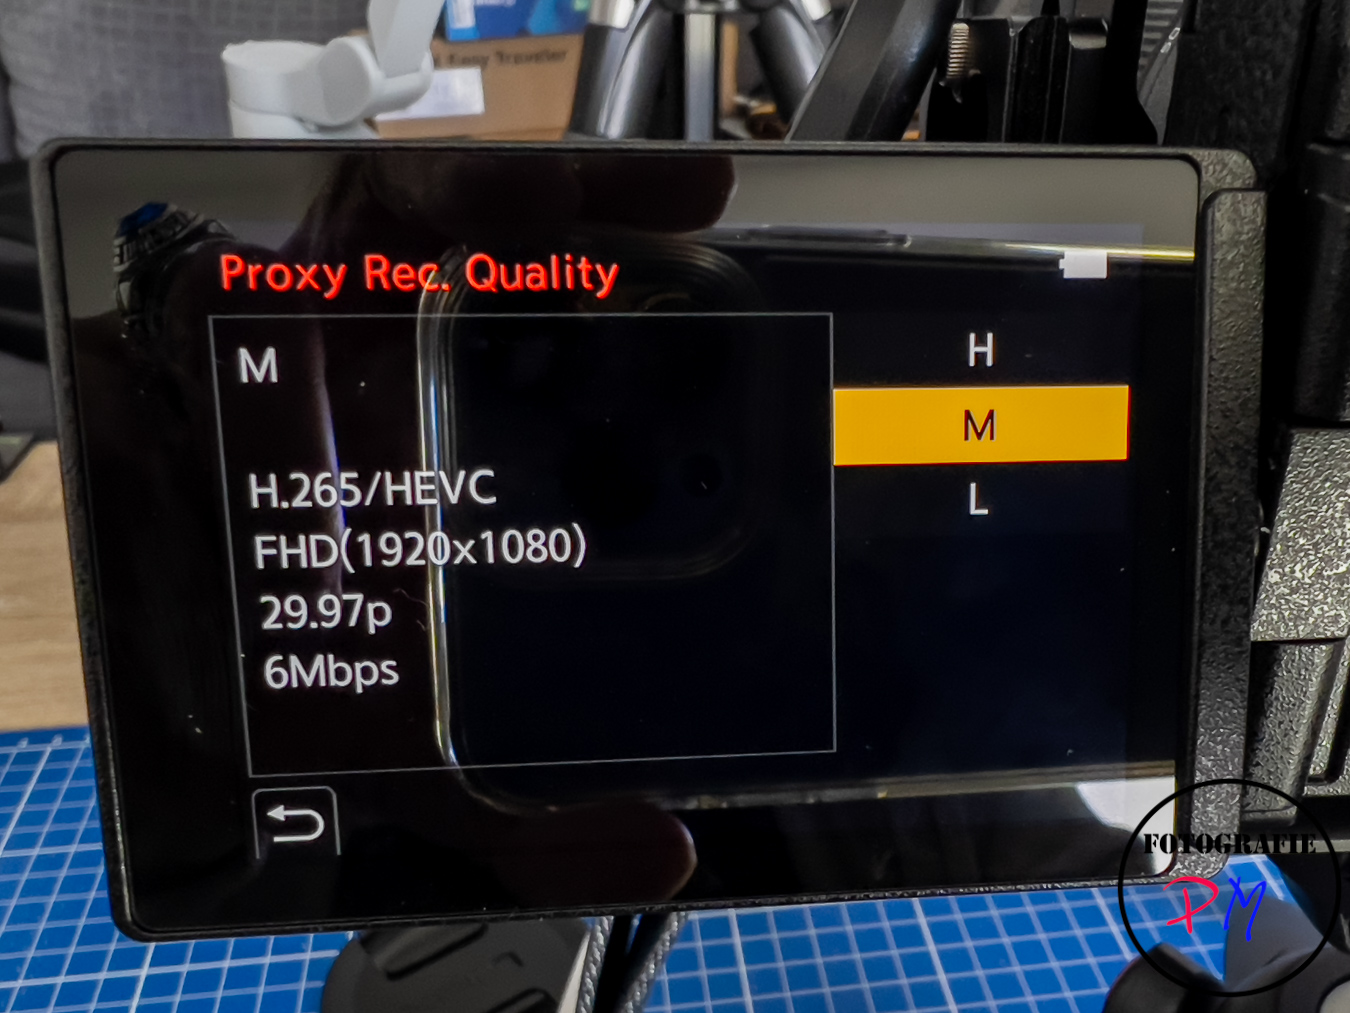
You can switch the function on and then you have 3 resolutions available for the proxy files.
I chose the medium size here, which has full DH and only records at 6 MBit/sec. The main video is then written either directly to a connected SSD or to the SD cards in slot 1 and the proxy file to the memory card in slot 2.
But there are restrictions when it comes to the maximum resolution. The maximum size for simultaneous recording of proxy files is the C4K format. So not an option for the Opengate format.
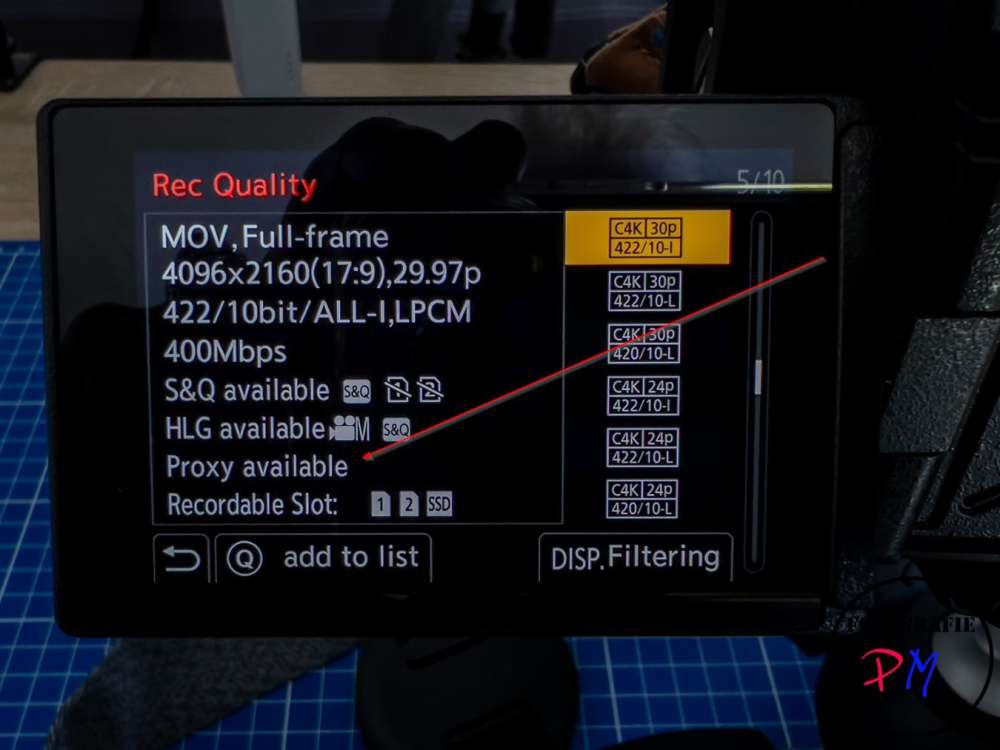
The options indicate whether proxy recording is available. And as in the example here, almost only settings that are recorded AllIntra and with higher bit rates should be used. And with these, mainly because of the AllIntra coding, a weaker PC has fewer problems anyway.
But then there is another restriction. This is the double slot option, so for example, as I have set it, video on slot 1 and photos on slot 2 no longer work, which is understandable to some extent. But if you want to record video clips and proxy files on both SD cards, they must both be the same size!
But you can copy the proxy files into a “Proxy” subdirectory and then DaVinci knows directly that proxies are available for clips.
Conclusion
The proxy files make it possible to process larger or more demanding video formats even with a less powerful computer, and the new settings also make handling easier. If you do not select the proxy files when archiving a project and delete the project directory, then there will no longer be a directory that fills up the drive over time.
ciao tuxoche

