Archiving Youtube Projects
You might remember when I reported on my experiences with Handbrake for archiving video files back in January 2025.
Introduction
![]()
For archiving videos, especially for YouTube projects, I needed a method that did more than just reduce the size of the video clips. Since you can’t make corrections or replace the video later, the projects are practically never edited again.
This leads to individual video projects taking up to 40–60 gigabytes, depending on the recording size, which adds up considerably over the years.
Handbrake Approach

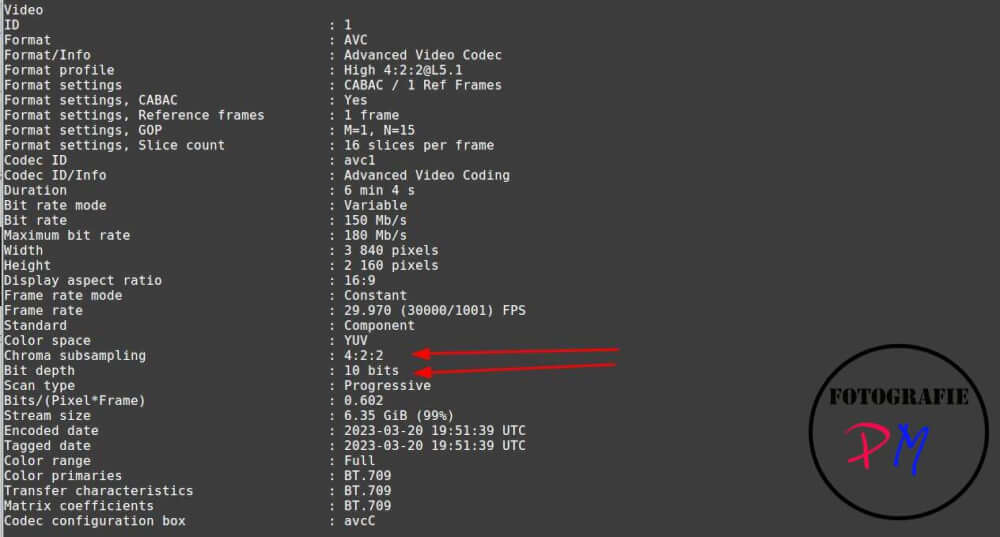
Back then, I used Handbrake to reduce the file size of videos while maintaining good quality, making them easy to archive. However, one problem was that Handbrake couldn’t automatically distinguish between 8-bit and 10-bit files.
This required the use of other tools like MediaInfo in a script to determine whether a video was in 8-bit or 10-bit format in order to select the appropriate preset. Therefore, I never actually implemented this project, and other projects took precedence due to time constraints.
New Attempt with FFmpeg
Now, however, I’ve started a new attempt, this time a) with FFmpeg and b) running under Linux. This is because writing scripts is easier here than, for example, in the Windows shell. Considering efficiency in terms of both achievable file sizes and energy consumption, my previous assessment remains valid.
The small Raxda X4 is still the most efficient due to its low power consumption, even though it has a long runtime. The advantage of FFmpeg is that it doesn’t alter anything during conversion, regardless of the format or subsampling (420 or 422). This preserves the color depth, and you simply have to decide which quality level is sufficient for your needs.
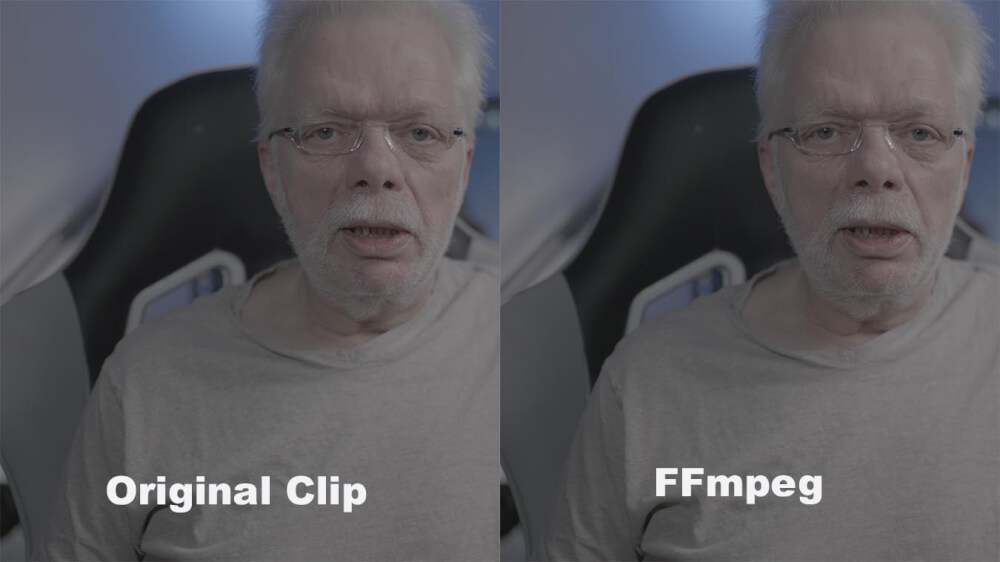
I’ve already experimented with FFmpeg and have now reached quality level 16/17. While this produces slightly larger files, it doesn’t slow down the conversion process as much as a higher quality level. Nevertheless, the file size savings are still quite significant.
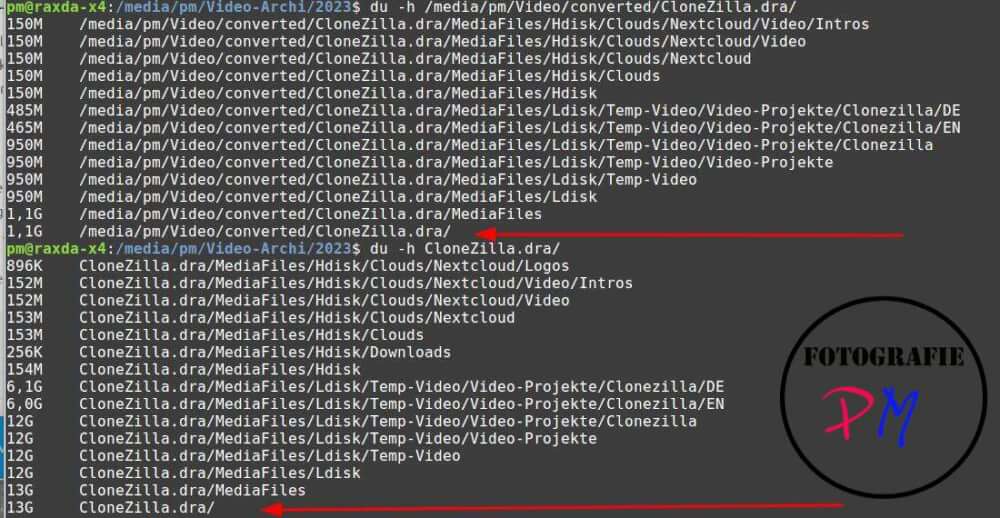
Going from 13 GB for the project down to 1.1 GB is remarkable. And you’ll see a slight reduction in quality, but it’s nowhere near as significant as the size reduction might suggest.
The Script
Actually, the necessary script was quite simple, except for one point.
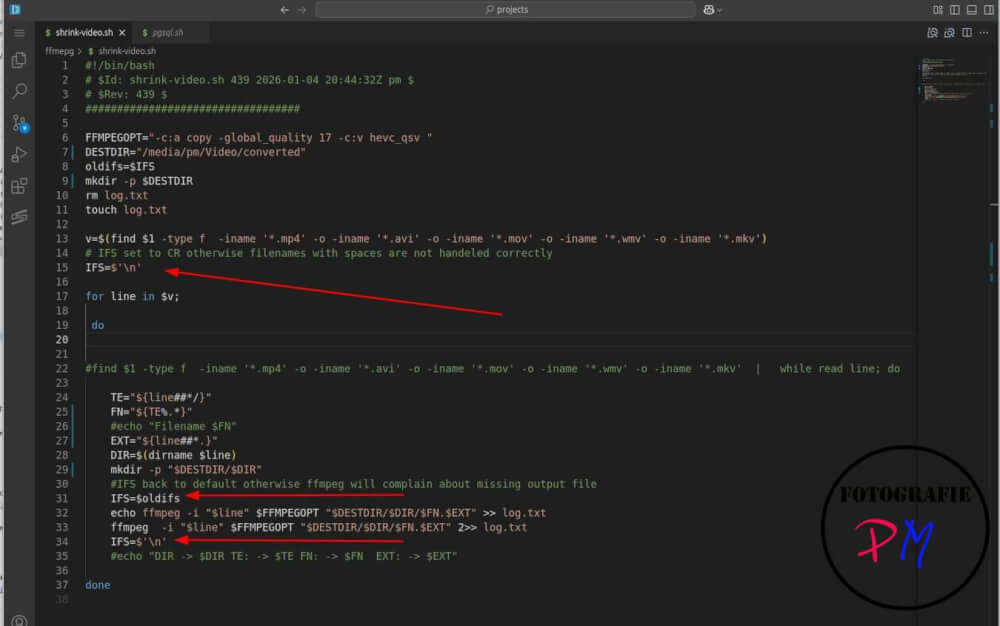
When recording with Windows or a smartphone, you often encounter filenames containing spaces. This inevitably leads to the filename list being incorrectly split, as the Linux shell uses IFS (Internal Field Separator) variables to determine how strings are to be divided. Since the filenames were on separate lines, I had to set the IFS to newline character with “\n” and then reset it before running ffmpeg.
I configured it so that, for example, I play a 2023 edition on my small Raxda X4 and run the conversion script to an external SSD. Afterward, I can randomly sample the resulting files and decide whether the rather large originals can be replaced by the much smaller ones.
Conclusion
I’m still comparing original clips and the ones reduced in size by ffmpeg, at least on a random basis, and haven’t yet found any where I’d say the quality isn’t acceptable. However, the storage reduction is already considerable, from 4.1 TB down to 984 GB, and that’s a significant difference for video clips that you wouldn’t normally touch, since you can’t edit anything on YouTube anyway.
ciao tuxoche

