Saving storage space by converting to DNG?
Today’s post is about how you can convert your RAW files to DNG and thereby save storage space, and in which cases this is recommended.
Introduction
![]()
I deliberately put a question mark in the title because after initially being happy about the space saved, I decided not to convert my RAW files to DNG. I had started converting the large number of shots that are usually taken in a timelapse, for example, to DNG. Then it could happen that the saving for a timelapse could easily be several GB.
As nice as it is when the resulting file is only 30-40% of the size of the original file, but back then, 5-6 years ago, there was a decisive disadvantage for me when converting to DNG with lossy compression. The resulting files only had a color depth of 8 bits, and this of course limited my post-processing.
What does it look like today?
I recorded a video about this:
Lightroom now offers export to DNG for Camera RAW version 15.3 and higher.
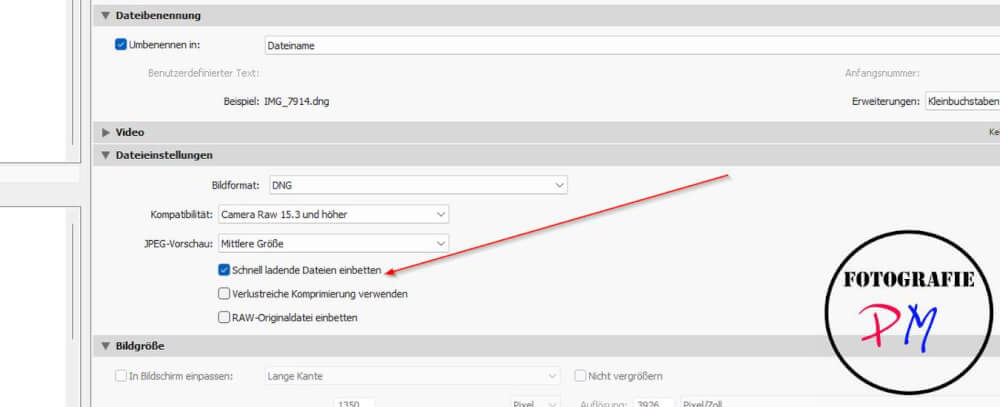
If you want to solve this by exporting, you can easily export to the same folder as the original. Then you only need to synchronize the folder in question.
What do the results look like?
Given the results, I was surprised at the good quality of the DNG files
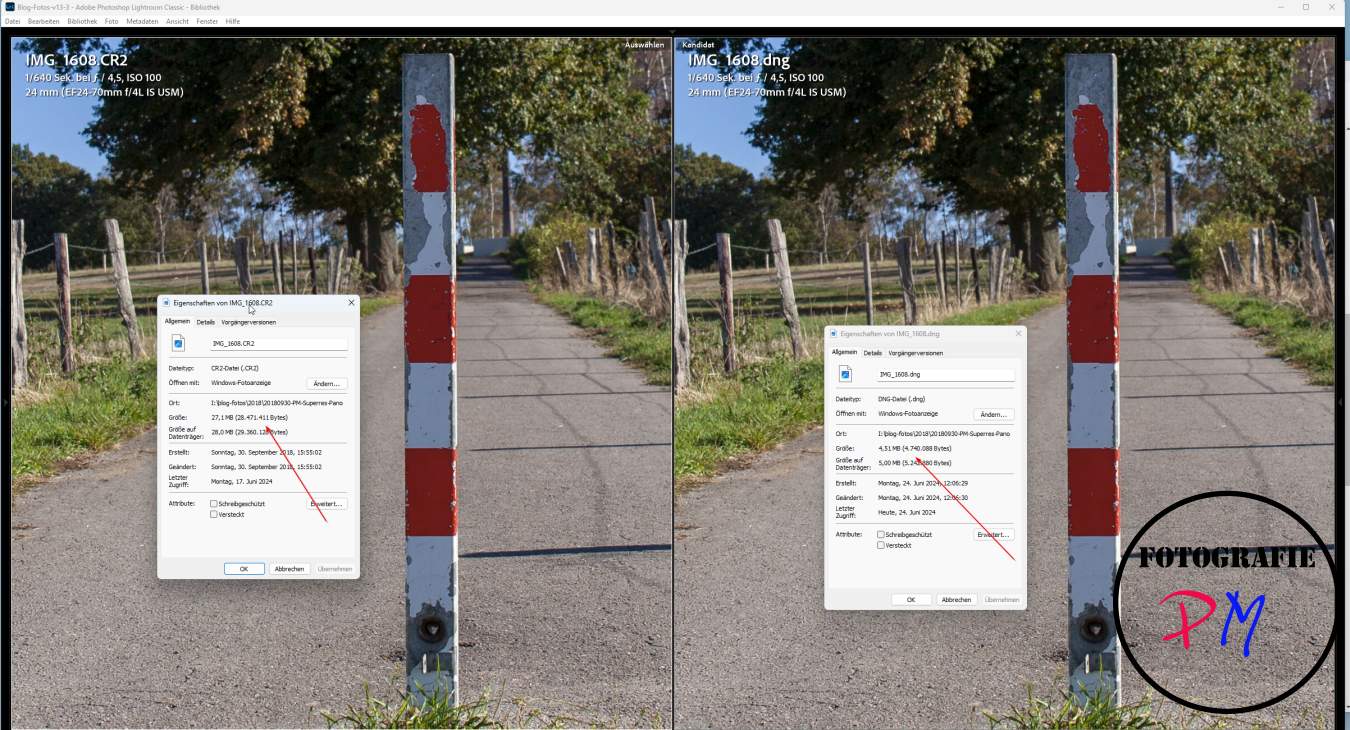 Lightroom offers this useful function of being able to compare 2 (or more) images, and this is ideal in this case because you can then zoom in to the same extent.
In the example above, the DNG file was only 3 MB in size, while the original was almost 24 MB in size. That would be a reduction of around 85%, which is already huge. However, the size of the reduction also depends on the level of detail in the image and how many different colors are present in the different parts of the image. Here, for example, there was a lot of green in it. In an image with a lot of blue sky, the order of magnitude would certainly be similar.
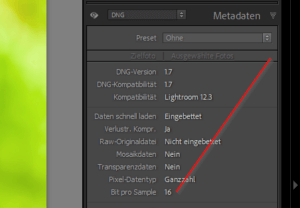
But the best thing is that the resulting DNG is always 16-bit in terms of color depth, so we still have the full editing options.
There is just one exception: tools like Topasz Denoise and the like like to have the original RAW image for noise reduction.
Here is another example with an image from the Lumix S5 and lots of blue sky 😉
 Here the RAW image is 34.5 MB while the converted DNG file is only 4.5 MB. This also roughly saves us around 85% space. But the best thing is that you can’t see any difference in the 100% view. Just try it out on a few sample images.
Convert all images or just certain ones?

I still have a bad feeling about deleting RAW files because they are what the negatives used to be, i.e. originals. Based on these results, I will now gradually convert my timelapse recordings again, because this is where it is most worthwhile, because such a timelapse sequence can quickly consist of several hundred images.
But extensive focus stacks or panoramas can be candidates for such a conversion. And I will certainly also convert the images that have been taken for this blog over time to DNG.
Everyone has to decide for themselves whether to convert the pictures of their family or family celebrations, because on the one hand such images are worth remembering, on the other hand you will very rarely (have) a 60x90cm print made of them, and even if you do, the DNG images should be able to withstand that.
And if you plan to do such conversions, Lightroom always offers the function to carry out the conversion under “Library”. And if you want, you can even delete the originals and the images will of course be integrated directly into the catalog.
 I did this once with my blog photos, some of which consisted of RAWS from the Canon era, but also of RW2 files that were taken with the Lumix G9 or the Lumix S5. First of all, Lightroom has a bug here. If I search for all the RAW files that I might want to convert, then they are only all of them if I don’t use stacks. However, if I use stacks, only the top photo in the stack is found and converted.
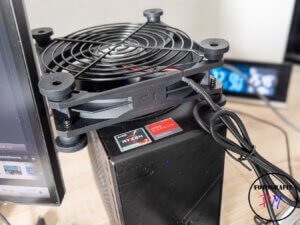
If I really want to find all the photos, then all the stacks have to be displayed first. Then it works. I then converted all of the almost 2,900 RAW files. As a precaution, I put another fan on the case, because the temperatures rose quite a bit in the almost 40 minutes.
But at least the collection of blog photos only comprised 118 GB instead of the previous 169 GB. And that’s a difference.
Conclusion
With the greatly improved conversion of RAW files into the DNG format, this format really is an alternative for larger series of images in order to save space when backing up. What do you think about it? Let me know in the comments.
ciao tuxoche


